Wednesday, 16 December 2009

Final 4 Silent Movies + Storyboards

So here they are. The final series of 4 Silent movies along with my final digital storyboards. This brief i found very enjoyable. Learning new software was a bonus - because it felt like we were all starting at the same point being 'beginners'

Below - My final 3D sequence. I was so proud to be able to make it into 3D alone, but to make each of the letters move and have pace to keep to the word 'Zoom' was a very hard, but worth while process. Keeping with the strict colour rules of only using 2 colours, plus one background colour actually worked to my advantage.


Below - My first attempt at making the letters move and come toward the camera in some sort of 3D sense. Basically it went to crap, but i did make this reasonably good sequence. I decided not to make it hard for myself by only using 2 colours. I decided to also use an opacity tool which gave me the advantage of fading out letters which i didn't need/want.


Below - When i think of the word 'Zoom' ... for some reason i think of our eyes. And how our eyesight views things both up close, and at a distance. I decided i would use one other colour (red) which would give more impact and become a useful factor in the middle of the sequence. Again for one of my first attempts - not bad!


Below - This was my first realistic attempt. Even though its pretty simple and uses all of the tool and tricks we learnt in our first workshop ... its still affective and answers the brief, both relating to the word and use of colour, scale etc.

3D - yes mateee!

Development (timing storyboard)


The motion above is the stage i got too when i deiced too develop my idea through using the timing storyboards.


Above: The storyboards i used too develop my timing and my idea in general. It helped me tweek areas and erase others. In all a very succesful process as it helped me generate what is my final of 4 videos.

Storyboards

Storyboards which show the initial design process. The more detailed boards which show timing and each frame will follow once I have started too produce the motion in After Affects. These boards below give a good starting point too develop from.

Tuesday, 15 December 2009

Zoom 3D (Developed)

Storyboard Session

So we had a session on storyboards - how too use them and how not too use them. Storyboards I had previously been producing were giving me enough detail on direction, camera angles etc, however the boards needed too give much more detail - including:
  • transitions
  • timing
  • sound
  • key points
  • camera angles
  • direction

Above: This is our initial board produced in a group of 3 which addressed key frames, speech and timing. Although we picked up some good points through this, we did not give ourselves enough space for more detail - which could include more detailed transitions and dialogue.


Above: Close up image shows how we staged the dialogue too fit in with the timing and transitions of the motion.


Above: Some key frames which we decided too highlight. Along with highlighting these we gave details of the timing where these transitions slot into place.


Above: After being told what we were doing rite and wrong, we went back too the drawing board (so to speak) and produced a more detailed storyboard which included the key transitions, dialogue and timing. We spread our timing slots on the storyboards too 10cm's per second. This allowed us too produce a more detailed description of what was happening in the motion.

Zoom 3D

Saturday, 12 December 2009

Wednesday, 9 December 2009

Zoom (Motion)

So here we go ... starting to put what we have learnt in our two workshops together. this is my first real ttempt at making one of my four final motions. I enjoyed making this clip and really enjoyed the final workshop we had today. Anyway enjoy the clip

Monday, 7 December 2009

Zoom (Development)


My chosen word. Out of - 'construct, zoom and transform' Below are going too be development sheets which have been produced for a workshop with Fred on tuesday. 3 sets of 12 storyboards and one 18 frame board.


3 Above images: The 12 frame storyboards originally produced in class which i re-made for our workshop on tuesday.


Above: All the frames from my 3 sets of 12 too make 36. Now to cut them down to 18.


Above: My 36 frames reduced down too just 18 - now too draw them up on the 16:9 scale required.


Above: The final series of 18. As explained before, we had too use our 3 sets of 12 frames together but reduce it just down to 18 frames. Will see tomorrow if i did it rite or not.

Sunday, 6 December 2009

ZoOm - 2

Same as below, but playing around with one colour and the opacity of the colour. Thought i would add it anyway. Enjoy ..

ZoOm

Lets start playing with the word 'zoom.'
One of my three words which i decided too develop while developing my own skills on the new software i earlier mentioned - After Affects.
Below: This is my first real attempt at using the basic tools we have been taught too 'Transform' area of letters or words. I will view the word 'Zoom' and take into account what a photographer associates with the word. Enjoy ..

Saturday, 5 December 2009

Motion Graphics (practice practice)

Okay - so this is the final practice im having before i make a start on my actual chosen word. I tried using several different tools too make different affects. These include the opacity, scale, position etc.

Motion Graphics (more practice)

Okay, having a play with more type and bringing in the one chosen colour (not including the black and white) Anyway ... enjoy!


Friday, 4 December 2009

Motion Graphics (practice)


Motion Graphics (the begining)

Want too see a very first attempt at motion graphics that will amaze and inspire you? well this video is not it. This is my attempt, quick 2 minute job, Which i was pretty proud of haha!

New Brief!

New brief - sounds amazing!

Motion Graphics - and im very excited about it. Were going too be learning how too use new software (after affects) which is awesome!
Breaking the brief down into a short explanation - we have too take 1 of 3 words which we choose from the 'randomizer' and produce it in a 'silent movie' motion graphic. Were limited too black and white, and one other colour (not including gradients)
This is going too be very enjoyable.

Random

Thought i would put this up.
Its one of several final mockup t-shirt designs that i initially designed for the live brief 'Electronic Poet.' However when i went too the final briefing a week before deadline - that i had totally misunderstood the brief.
The brief stated that the designs must have some sort of relation too the word 'tribe' So designs must include eg: a design based around tribal colours.
My design was based around the 'electronic' area of music. I read the word 'poet' and targeted my deigns too be based around lyrics and music.


I tried too be clever while being subtle with the design. as you maybe able too see, i attempted to make an image out of several aspects too do with music. The circle obviously makes the vinyl which i placed the female singer on. Headphones on the woman meets the centre point of the vinyl. While the player also makes a microphone.
Im very pleased with my design, i may even get it printed myself - because i love it!

Tuesday, 24 November 2009

End of Module Evaluation

1. My ability too research during this project i feel was successful. I gathered a bulk of secondary research from both the internet and library. Primary research however was not as successful. although i did gather a fair amount, i did not make use of time too make questionnaires and such like for others opinions, i feel this could affect my overall grade however, with my subject being skydiving a consider a massive amount of my research too be the skydive i took part in (granted months before this project was set - but it still counts)

2. Experimentation for this project was more obvious too previous project i had done. This project i experimented with toilet tissue, different stocks, and even the centre of toilet rolls too produce what i feel was a successful brand and package. I feel i have become a bit of a mac monkey although my development sheets with quick ideas and drawings show that my ideas are initially put down on paper - not straight onto the mac.

3. I feel the breathe of ideas i had was a successful amount, and that i chose too develop my final idea at the rite stage in the project. I do feel i used my time affectively however not too its full potential at all times. The development i did proved very useful as back up work too my presentation boards.

4. I choose too take the same approach i had too later last year, where i document design sheets and research sheets in a clear A3 design folder, but use my blog too document the majority of my findings. Once again i found my blog a lot more useful too document development, however the folder came in useful for group crits and too get advice in the studio from tutors.

5. I feel my work was a good success, however my final presentation boards do not show my development and concept too its full potential. I feel however this has been a great learning curve on how in future i will be handing work in for assessment and grading. My final design boards admittedly are not as aesthetically pleasing as they could be - and my 16 page booklet really does put them too shame for legibility. layout and design. With this taken into account i would be happy too walk away from this module with a 2:2 - i have seen my strong and weak areas through this unusual and new way of handing in work and feel i can do a much better job.

Wednesday, 11 November 2009

What is 'Good' - Part 2

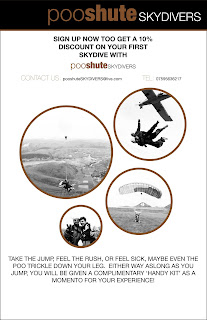
Below is my final leaflet (each side) Directly below will be the front side. Which will always be on show too the viewer and the 'skin' too the roll! Bottom is going to be the back, which will not be legiable until the viewer has 'torn' their way into it.
Im pleased with how this has come along, I will be speaking too my tutor tomorrow for guidance and advice too whether I should do anymore too it or not.


What is 'Good' - Part 2

So finally deciding upon the design and layout, mock-ups was the next step ... enjoy!


Several of the mock-ups that i produced when i started on this new idea! Handy double sided tape holds the together great.


After designing a quick mock-up of the outside of the leaflet, i printed it straight off and started playing with the fold and size. My first mock-up was smaller than i wanted, so size had too change.


Quick snap of how the real product may work. Again this is only a mock-up but gives a great impression of what the product is capable of!
Next steps - redesign the logo and leaflet all together. Keep the existing idea of unfolds and pull tabs. Colour ... maybe a poo colour?

What is 'Good' - Part 2

After designing away at uni, i was in a real creative zone ... so what better too do than go home and play with toilet roll - yeh nothing better! So below are some experiments a did with the toilet roll, seeing if it worked and / or looked good!


I wanted too test out how the 'pull cord' would actually look, and if the scale, layout was correct. From what i found at the start - its good!


Again, same type of experiment looking at how the product would look fully torn ... and i still like it, and going back too it - its an original idea for how too promote a brand through a 'standard' A6 leaflet.


After the 'pull cord' has been fully torn off, it will leave nothin but a piece of A6 paper/card. When i did this, i found the way the stock folded around would be lovely and relate well too the shapes of the parachutes.
Next too do - work on a leaflet and start applying it too this design ... dont forget the pull cord!

What is 'Good' - Part 2

So now i have developed my packaging (which im very pleased with) It was time too begin the advertising campaign. I decided a flyer would be best for this, so after a lot of research and idea generation, it finally came too me on how my flyer could be one of the most original and only 'packaged' flyers out there.


So this is where my concept started taking place. After a load of fast designs I thought about the 'pull cord' used on parachutes ... and then proceeded to find if i could use this in my advertisement / promotional campaign.


So i decided too get back too the simple toilet roll centre (the brown card thing) and base my flyer design around that. This made it easier for me too bring in my idea of using a 'pull cord' in the design.


Above shows how the viewer must actually interact with the product / flyer too gain the information. The plan is the 'cord' must by pulled down (torn off) then the flyer will open up and reveal all the relevant information.
More development needed however it is starting too take form, keep up to date, im on this all night!

Wednesday, 4 November 2009

Random

So me and the boys were chatting about the previous nights events, joking around about alcohol and who took who home etc ... when Rohypnol was mentioned - well that was it, i just had too slap something together quickly for a laugh, so here it is!


What is 'Good' - Part 2

Well, let the designing begin once again! After drawing and sketching down ideas which consisted of a range of ideas including: drinking products, holders, bags etc i decided my strongest idea was too produce a package which could hold toilet paper and sick bags.
I want my product too be humorous for the viewer and too promote my company using a different technique too usual skydiving companies serious tone too the audience.


Above - my original design which i was initially pleased with. Once looked upon in a different way however, the red could be associated with blood (or death) and the cross at the top does not help as people would link this with hospitals and again ... death.


Above - the original design put onto the packaging (once again self designed) I wanted too build an original package which could be used purely too hold my pieces (toilet paper and sick bags) I produced this design before i thought about the colour relation to death as mentioned in the text above.


After reworking the colours and changing the cross this is how it has come out so far. I replaced the red with a bright and natural colour blue. In turn this worked well with a pink/purple. These colours related too my activity which is extreme in itself plus these colours are more attention seeking which works well for my target audience and tone of voice.

After a very successful and helpful criticism today (wednesday) it was put across too me even though the company name 'parashiit' is good and humorous, it could also work in a negative way and scare people off. I was told there is a fine line between what i am trying too do, and i was working it well, but needed too change the name too make it a success. so along came 'pooshute' ... hilarious, and not scary in the slightest ... gives anyone a slight grin when read.


So i chose my design, the type i wished too use and the layout - and so far i am very pleased with the result. The packaging style and form is as good as i hoped and now the logo design is coming along a treat.


Final image - only one subtle change here but i feel it makes all the difference and looks more professional! I loved the way the piece was working, the layout, image, type etc, although i felt there was too much white! So i changed the logo type from white too purple - subtle but much nicer!

Sunday, 25 October 2009

Type (Paragraphs and Images)

Another Thursday afternoon means another Type lecture with Visually communications very own Graham! This week were learning about how too use column's in the layout of our work, and how point size, weight, type etc can be used too full advantage even in the smallest of spaces.  Below are all my column set-ups and layouts, going from one grid (full page) too a 5 column layout.  All the image below are screen shots from InDesign @ A4 scale. 


Above - A screen shot showing all 5 of my layouts.  This screen show was on 'Normal', the following shots are on 'Preview' which means you do not see the guides or columns used. 


Above - We start with the single Column layout.  In this what was found in the class was because of the massive space too fill, the point size of the type could increase to around 10 - 12. The 'Leading' was also found too be (on average) 2 - 3 point sizes larger than the type itself.  We were then told by Graham this would be a great rule to follow in general, eg: 9 point type - 12 point leading. 


Above - Two column layout.  I found this simple enough too adjust too, the hardest point for me was scale and layout of the image.  After several attempts including placing the image central, bottom right etc ... I found top left was best suited as it directed the viewer too the text below immediately. 


Above - Spacing was becoming a large issue now.  Graham said that viewer of a piece could be 'scared off' from reading the text if there seems too be too much of it - and he was so rite!  My first attempt at this saw the leading brought closer, the point size smaller and the image larger. After Graham explained how seeing white on the page makes the viewer read it, I decided too space out the paragraphs and align the text too the right ... and what a difference!


Above - Although you may see the text is only in 3 column's ... in reality it is in four.  During the lesson when i came across the problem of a lack of words per line, point size too small etc i viewed the column's purely as guides and decided too 'brake the rules' by spreading my text across the two.  This way it makes the text more legible and more aesthetically pleasing.


Above - Again appyling my rules from the layout above, the 5 column layout just saw the number of words per line become fewer and fewer.  Too solve this I placed the image central and in one of the single columns to show the viewer the space I was working in.  Once again I brought the paragraphs in-together but then indented them too separate it for the viewer. 


Above - I decided too make a print screen of my final 5 column layout along with the guide lines so you could see the spacing we were asked too work within.  If you look closely you can see the text has several lines coming through the direct centre.  The right line is where the first grid ends, then the following line is where the next column begins.  The space between the two = guttering.  
What have I learnt this week - well read above ... a lot!  Grahams lecture manage too get me focused and engaged and I never thought I would say this but, I love type!

Thursday, 8 October 2009

Emotion in Type ...

Another lecture with the ridiculously hilarious Graham.  This week its all about weight, tone, and using more than just one word.  So we start the lecture with having too write 'FOUR THREE TWO ONE' but then we are told it has too read 'ONE TWO THREE FOUR.'
So this is my interpretation of what we had too do below -


The idea was to make the viewer read from right too left instead of left too right.  The way i did this was too increase the point of the first word I wish the viewer too read (ONE) once I had done this I also changed the weight too bold.  From this step on I went smaller and smaller with each letter so that the viewer would read it as the eye catches. 


Making seperate type boxes was the next step.  But we also had to play with the layout while making the viewer read the type as 'ONE TWO THREE FOUR' so I decided too use different fonts too make bolder and more noticable type.  I am pleased with how this came out, when enlarged in better detail it is easy for the viewer to understand my system and I feel it worked well. 


So were told to choose a phrase.  'Easy come, easy go' 
This time we had to do the same, make the viewer read the text as it should be for example, if i got it wrong the viewer would read 'go easy, come easy' .... anyway another rules was NO PUNCTUATION! 
So I started with the simple upper and lowercase.  Uppercase for the first part of my phrase, and lower for my second.  too make sure my vie
wer read the text as I wanted I turned the 'easy go' upside down and made it lowercase.  Another part of my process was too make my starting word very bold - black as the night. and each word (in order) after that would be a percentage tone of black.  


Once again were told to experiment with layout.  So I went straight for the eye catching easy, which immediately directs your eye too 'come' on the right hand side.  After letting your eye explore the page you see 'easy go' (lowercase once again) in the bottom right hand side of the page. 


This was the one I wanted too get rite.  I only wanted too use the word 'easy' once, even though it comes into my phrase twice.  So i went for the bold uppercase 'easy' using helvetica.  Because we were told that it is involuntary for the reader to go from right too left i thought that was best place too put 'come' in uppercase but using a 70% tone of black so the viewer does not read it first.  I hope the reader then reads 'easy' again before spotting 'go' on the bottom left of the 'E'.  I used lowercase helvetica in an ultralight weight.  I am pleased with how this came out ... but gutted if it does not work, however its all part of the learning process.